<< Home    << Transmition    << Surveyor    << Drive Test   


Jumat, 03 September 2010

How To Create Dial-up Setting for NEC (Pasolink) Equipment

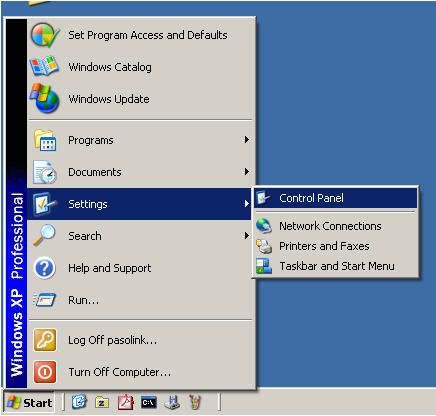
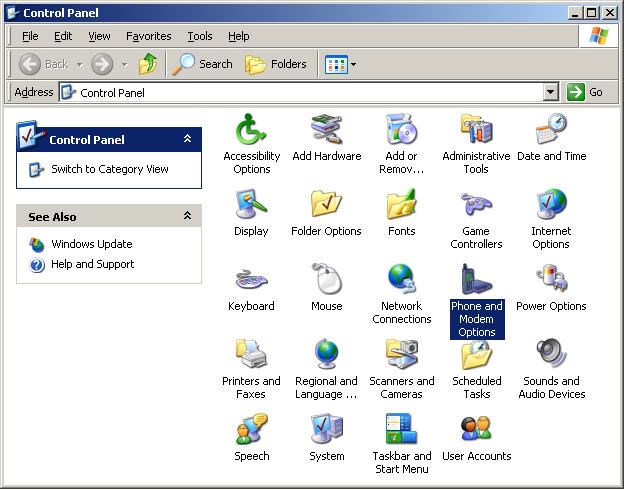
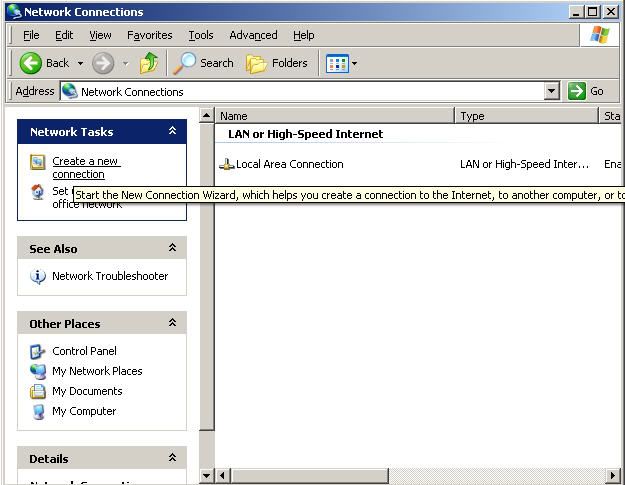
-> Click on Start | Settings | Control Panel | Network Connections icon to start configuring the Dialup setting.


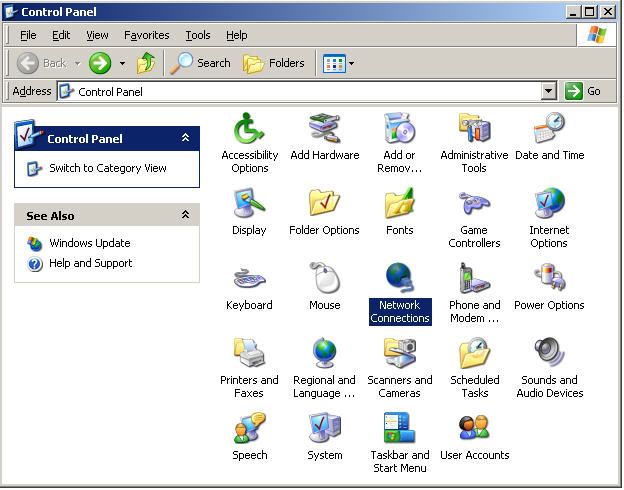
-> Network Connections is displayed. Click the Create a new connection in Network Tasks category.


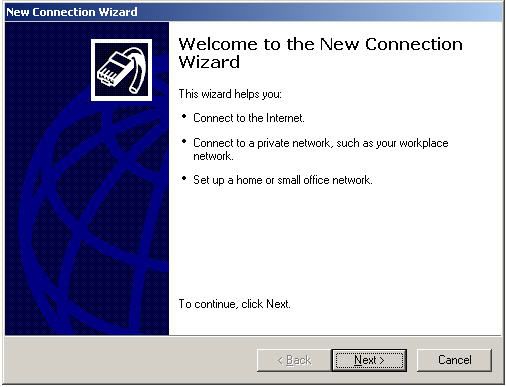
-> Click on Next button on the next message box.


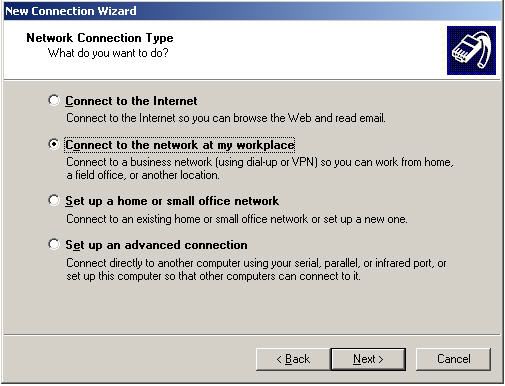
-> Check on Connect to the network at my workplace and click on Next button to continue.


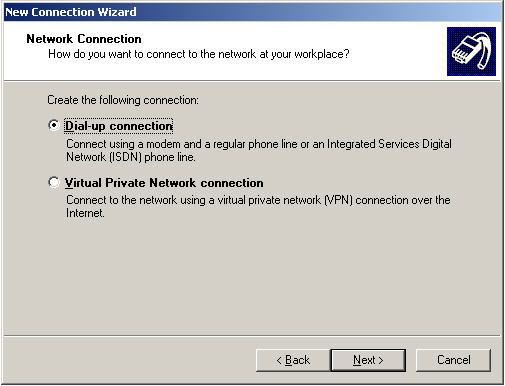
-> Check on Dial-up connection and click on Next button to continue.


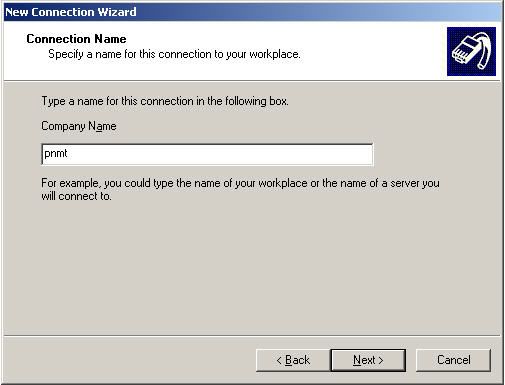
-> On the Network Connection Wizard window, type in pnmt on Type a name for this connection in the following box. Click on Next button to continue.


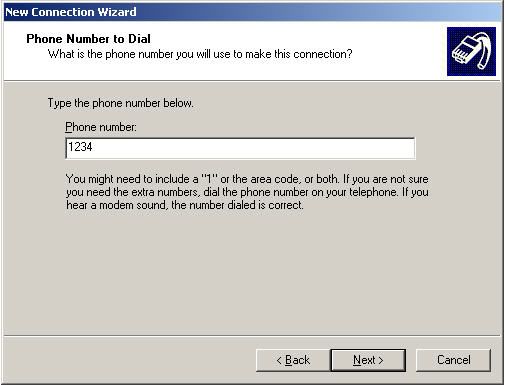
-> Enter any number in the Phone number box. Click on Next button to continue.


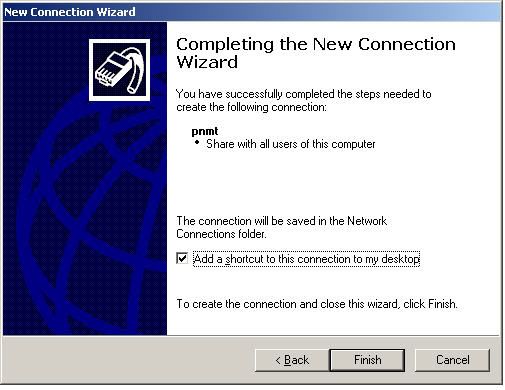
-> Verify that the connection pnmt has registered. You can also create a shortcut on your desktop if you need. Click on Finish button.


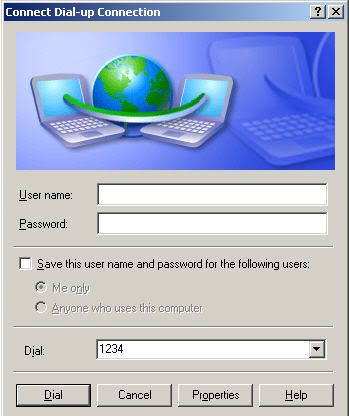
-> On the Connect Dial-up Connection window, click on Cancel button to continue. Click Properties button on Connect Dial-up Connections window or right-click and select Properties on highlight new item for pnmt..


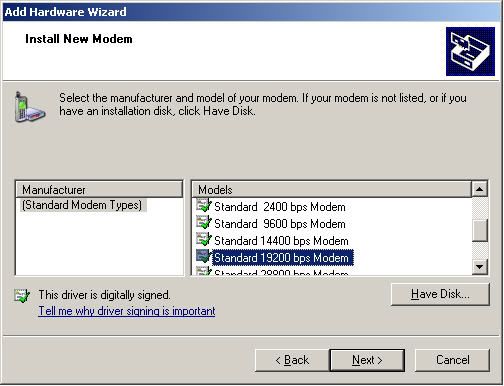
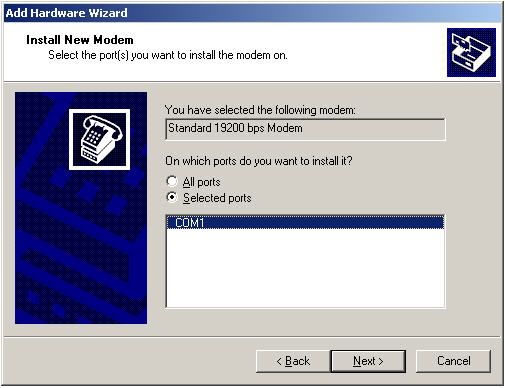
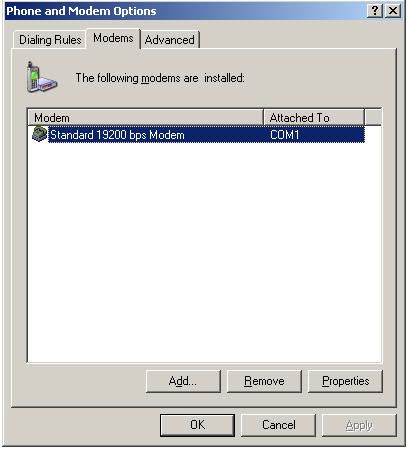
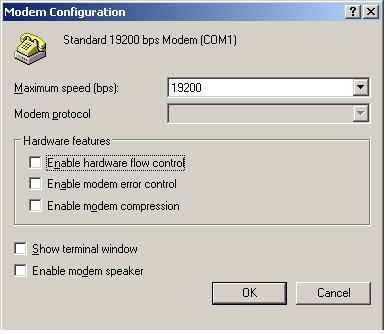
-> On the Dial-up Connection Properties window, verify that selected device is Modem- Standard 19200 bps Modem [COM1] on the General tab. Click on the Configure button.


-> On the Modem Configuration window, check off all five boxes.


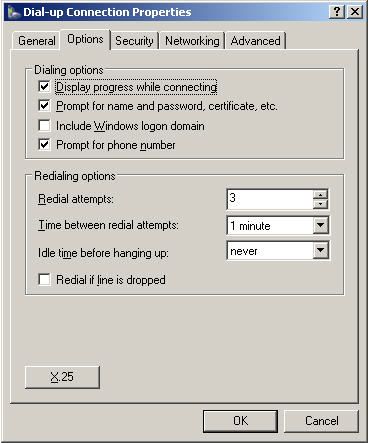
-> On the Option tab, keep default setting and click on the Security tab.


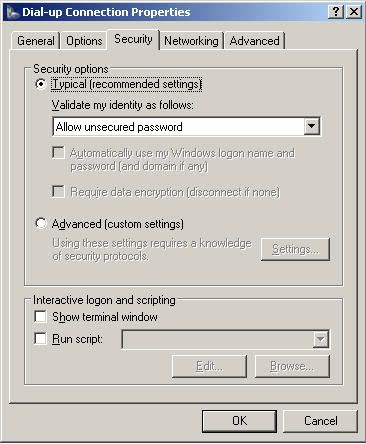
-> On the Security tab, keep default setting and click on the Networking tab.


-> On the Networking tab, verify that Type of dial-up server I am calling is PPP and check off File and Printer and Client for Microsoft.


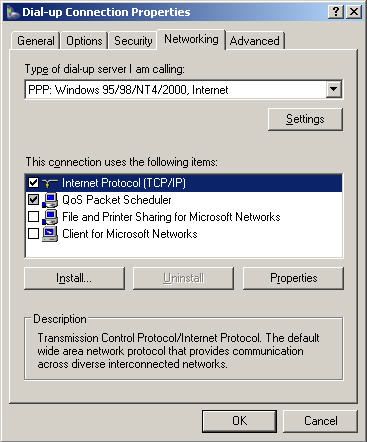
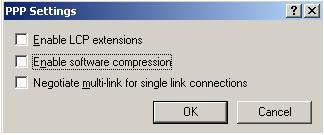
-> Click on Settings button. Uncheck all the boxes on the ensuing window just as shown in figure below. Click OK go back and highlight Internet Protocol (TCP/IP) then click on the properties box.


-> Verify that both Obtain an IP address automatically and Obtain DNS server address automatically are selected.


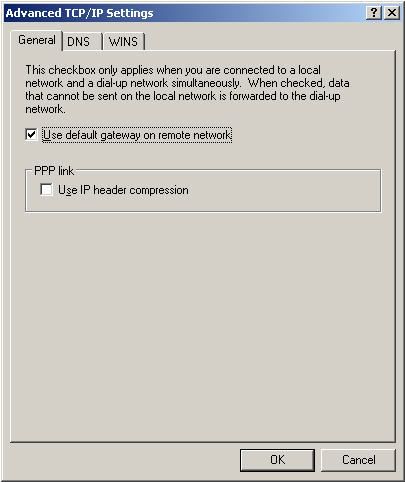
-> On the Advanced TCP/IP Settings window, check off Use IP header compression in the PPP link. Click OK button.


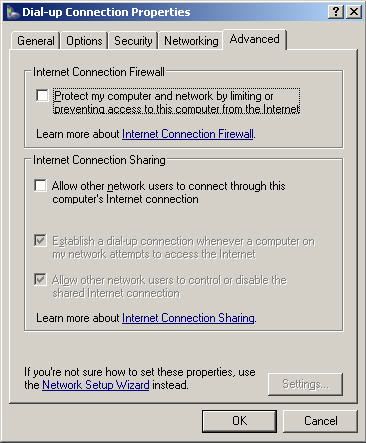
-> On the Advanced tab, keep default setting and click OK button.
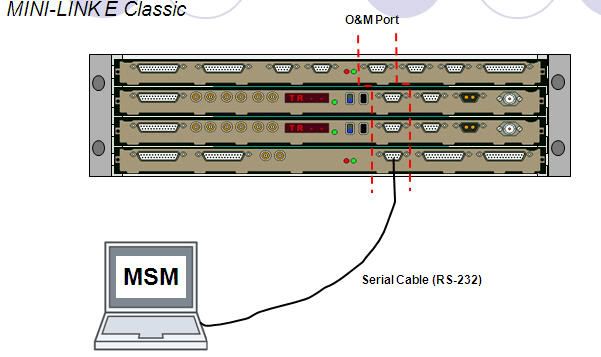


Label: ,

Read more!

Kamis, 02 September 2010

How to Setting Phone and Modem Options for NEC (Pasolink) Equipment

-> Click on Start | Settings | Control Panel on the Windows XP™ start tab.


-> Click on Phone and Modem Options icon to start configuring the modem.


-> Select country and input area code on Location Information. Click on OK button to continue.


-> Verify Location and Area Code.


-> Select Modem tab, click on Add button to continue detecting modem.


-> Check on Don’t detect my modem… box and click on Next button to continue.


-> Select Standard Modem Types and Standard 19200bps Modem from Manufacturer and Models list respectively. Click on Next button to continue.


-> Select Selected ports and COM1, then click on Next button to continue. If you are using multi-port configuration, select All ports to install the standard 19200 bps modem driver to all available COM ports.


-> Click on Finish button to finalize the new modem installation.


-> Verify that COM1 Standard 19200 bps Modem is displayed on the list. Click on OK button.


Label: ,

Read more!

Rabu, 01 September 2010

How to synchronization Port COM Minilink-E and Laptop.

-> Connect RS-232 Cable.


-> Click Start -> My Computer -> Manage.


At Computer Management window click Device Manager. Click Port (COM & LPT) Device and see what COM that connected i.e COM1 (this sample use usb to serial cable).


-> Login to Minilink Service Manager (MSM 6).


-> Go to Config Tab, and choose Configure Communication. In Serial Port Number Choose what COM that will be synchronization. i.e COM1.


-> Go to Network Tab and choose Scan Local, If we can find the Network so the synchronization has success.


Label: ,

Read more!

Senin, 30 Agustus 2010

Step by step Configuration/Commissioning Minilink-E (Classic) and scanning Frequency.

Step by step Configuration/Commissioning Minilink-E (Classic.


- Open Minilink Service Manager (MSM 6.3)
- Type the password “1111” -> Enter


- Click Network -> Select Scan Local.


- At a new window, double click TRMA. And will be appear specific window.


- Click SETUP -> Select AM. In AM SETUP Click config button. At AM Configuration Window select Protection Mode, Traffic pos/Traffic capacity, and ID for near end equipment. Than OK.


- Click SETUP -> Select HOP. In HOP SETUP setting the Frequency, Power, ATPC mode (in disable mode), Treshold -70 dbm, Farend ID, BER Alarm, and don’t forget to check Radio Check ID.


the device configuration is complete here.


Scanning Frequency
.
After completing configuration so the next step is Scanning the Frequency that will be use with reference to the table of DGPT ”Ditjen Postel”.
To scanning frequency the transmitter of equipment must be on OFF mode, principle of the scanning frequency is checked the device signal around is the frequency interference occurs or not with other devices, using only reception function on the device, whether of that site or at sites around. cheese reception at the scanning frequency depending on the capasitas of traffic also, but in general recieve level is less than or equal to-90dbm.
if the frequency really clear so we can turn on thetransmitter.


Label: ,

Read more!

Minggu, 29 Agustus 2010

All About Transmission/Microwave in Telecommunication 2

-> Transmission Configuration.
There are several configuration in transmission or microwave in telecommunication like :

- Unprotected 1+0
In this configuration there are only one Antenna, One Radio/ODU/RAU and One Modem
Unit for traffic.
If any trouble with radio or modem this hop will be down, because there isn’t
protect by other equipment.


- Protected 1+1
If any trouble in one of radio or modem this hop will be protected by other equipment.
i.e. If Radio/ODU 1 faulty so Modem 1 will be down. In this case the traffic capacity will be move to Radio/ODU 2 and Modem 2 automatically.
There are two(2) type for this configuration :

1. Hot Standby.
In this configuration there are only one Antenna, Two(2) Radio/ODU/RAU and
Two(2) Modem Unit for traffic.


2. Space Diversity
In this configuration there are Two (2) Antenna, Two(2) Radio/ODU/RAU and
Two(2) Modem Unit for traffic.


To Pointing or Aligment this configuration, use this rule :
- Step A: Pointing done only between RAU RAU 1A and 1B (RAU RAU 2A & 2B off).
- Step B: Pointing only RAU RAU 2A with 1B (only moving RAU 2A, 1A & RAU RAU 2B off).
- Step C: Pointing only with RAU RAU 2B 1A (only moving RAU 2B, 1B & RAU RAU 2A off).


Label: ,

Read more!