Step by step Configuration/Commissioning Minilink-E (Classic) and scanning Frequency.
Step by step Configuration/Commissioning Minilink-E (Classic.

- Open Minilink Service Manager (MSM 6.3)
- Type the password “1111” -> Enter

- Click Network -> Select Scan Local.

- At a new window, double click TRMA. And will be appear specific window.


- Click SETUP -> Select AM. In AM SETUP Click config button. At AM Configuration Window select Protection Mode, Traffic pos/Traffic capacity, and ID for near end equipment. Than OK.


- Click SETUP -> Select HOP. In HOP SETUP setting the Frequency, Power, ATPC mode (in disable mode), Treshold -70 dbm, Farend ID, BER Alarm, and don’t forget to check Radio Check ID.


the device configuration is complete here.
Scanning Frequency.
After completing configuration so the next step is Scanning the Frequency that will be use with reference to the table of DGPT ”Ditjen Postel”.
To scanning frequency the transmitter of equipment must be on OFF mode, principle of the scanning frequency is checked the device signal around is the frequency interference occurs or not with other devices, using only reception function on the device, whether of that site or at sites around. cheese reception at the scanning frequency depending on the capasitas of traffic also, but in general recieve level is less than or equal to-90dbm.
if the frequency really clear so we can turn on thetransmitter.


Label: Commissioning, Transmission/Microwave
Read more!
All About Transmission/Microwave in Telecommunication 2
-> Transmission Configuration.
There are several configuration in transmission or microwave in telecommunication like :
- Unprotected 1+0
In this configuration there are only one Antenna, One Radio/ODU/RAU and One Modem
Unit for traffic.
If any trouble with radio or modem this hop will be down, because there isn’t
protect by other equipment.

- Protected 1+1
If any trouble in one of radio or modem this hop will be protected by other equipment.
i.e. If Radio/ODU 1 faulty so Modem 1 will be down. In this case the traffic capacity will be move to Radio/ODU 2 and Modem 2 automatically.
There are two(2) type for this configuration :
1. Hot Standby.
In this configuration there are only one Antenna, Two(2) Radio/ODU/RAU and
Two(2) Modem Unit for traffic.

2. Space Diversity
In this configuration there are Two (2) Antenna, Two(2) Radio/ODU/RAU and
Two(2) Modem Unit for traffic.

To Pointing or Aligment this configuration, use this rule :
- Step A: Pointing done only between RAU RAU 1A and 1B (RAU RAU 2A & 2B off).
- Step B: Pointing only RAU RAU 2A with 1B (only moving RAU 2A, 1A & RAU RAU 2B off).
- Step C: Pointing only with RAU RAU 2B 1A (only moving RAU 2B, 1B & RAU RAU 2A off).

Label: overview, Transmission/Microwave
Read more!
All About Transmission/Microwave in Telecommunication
-> What Is the Transmission in Telecommunication field?
Transmission is one of the system in Telecommunication that have function to connect two Site/BTS (Base transceiver Station) until to BSC (Base Station Controller) using frequency for medium.
In terms of transmission there is HOP. Hop consists of two site/BTS/Tower and usually called the near end and far end. Near end is a Site/BTS where we are, while the far end is a Site/BTS opponent


-> Transmission Component/Element.
Below is the component/Element in transmission :
Outdoor Unit usually abbreviated with ODU and indoor unit with IDU.

- Outdoor Unit: "Sets the radio communication frequency and performances".
Antenna :

RAU/ ODU/Radio:

Medium Capacity: Frequencies between 7 and 38 GHz with C-QPSK and 16QAM
High Capacity: Frequencies between 7 and 38 GHz with 16 QAM and 128 QAM
BAS: Only RAU2. Frequencies are 24, 26, 28 and 31 GHz using C-QPSK
In Transmission RAU/ODU or Radio have sub band pair High and Low like this.

- Radio Cable: "Carries modulated IF, supervision channels and DC power to the radio unit".

- Indoor Unit: MMU/Modem Unit, SMU, AMM, SAU, ETU and etc.
- Sets traffic capacity.
- Traffic and supervision channels termination.

Label: overview, Transmission/Microwave
Read more!
How to change format coordinat in degree, degree-minutes, or degree-minutes-second?
-> Turn ON GPS
-> Press Page button until view page menus.
-> Select SETUP than select Unit
-> At grid position select what format that want to change (degree, degree-minutes, or degree-minutes-second, etc).
Below is the picture step by step to Change Format Coordinat in GPS:

Label: GPS, Surveyor
Read more!
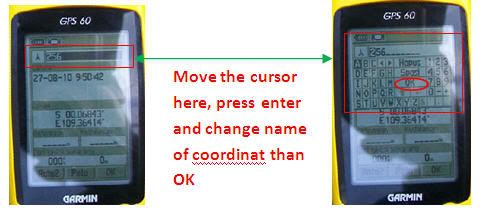
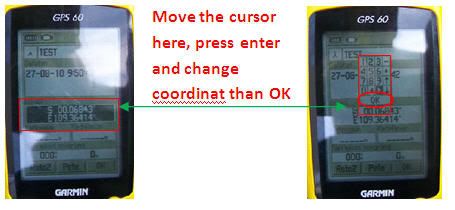
How to insert coordinat in GPS?
-> Turn ON GPS and Press mark button.
-> scroll cursor on the above to change name of the coordinat by press enter -> OK.
-> scroll cursor down to location -> enter
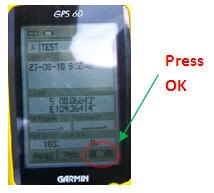
-> change or insert coordinat-> OK
Below is the picture step by step to Insert Coordinat in GPS:

Label: GPS, Surveyor
Read more!
How to change language in GPS?
-> Trun on GPS
-> Contunuies Press page button until view page menus.
-> Select SETUP and than select System.
-> At Text Language choose language that want to change.
Below is the picture step by step to change language in GPS:

Label: GPS, Surveyor
Read more!
How to mark a new coordinat in GPS?
Turn on GPS and put it to open place (i.e. field).
Wait GPS Searcing and get signal from Satelit.
-> Press mark button
-> move cursor to AVG button -> enter.
-> wait until estimated accuracy have value less than 5 -> save (this propose to make sure that coordinat in the best value).
-> scroll cursor on the above to change name of the coordinat by press enter -> OK.
Below is the picture step by step to marking a new coordinat.

Label: GPS, Surveyor
Read more!
Frequencies in the transmitting device (MW)
The frequencies that are often used in the transmitting divice is :
- 23 GHz
- 15 GHz
- 13 GHz
- 11 GHz
- 7 GHz
The greater frequency have short distance, and the smaller frequency have long distance. The greater frequency (25GHz, 15GHz, and 13GHz) are generally use in urban areas, and the small frequency (11GHz, and 7GHz) are generally used for backbone links.
Read more!


